
Chicken Milanese is an Italian dish made from thin, breaded cutlets fried until golden and crisp. The chicken stays tender inside, while the breadcrumb coating has a light, delicate crunch that never feels heavy. Ready in just 30 minutes, this recipe includes both pan-fried and air fryer instructions, so you can choose the method that works best for you!
In my Italian family, this chicken Milanese recipe is the meal everyone asks for. The "Milanese" method simply means the cutlets are pounded thin, coated in breadcrumbs, and fried until lightly crisp. In northern Italy, it's often made with veal, but in many Italian-American kitchens, including mine, chicken is the everyday version. It's traditionally served with a fresh side to balance the crisp coating, and my arugula spinach salad and burrata caprese salad both work beautifully!
Why You'll Love This Recipe
- Reliable results: includes step-by-step photos, video, and clear instructions to help your chicken Milanese turn out light, crisp, and evenly cooked.
- Tender chicken: the cutlets are pounded to a consistent ¼-inch thickness so they cook evenly without drying out.
- Flavor in every bite: the cutlets are lightly seasoned before breading, and the breadcrumbs are seasoned as well, building flavor into every layer - not just the crust.
- Light crisp coating: finely grated Parmigiano Reggiano blends into the crumbs for a delicate, crisp finish.
- Your choice of cooking method: pan-fry traditionally, or use an air fyer for a low-mess approach! If you enjoy air-fried recipes, try my air fryer chicken sausage for another easy weeknight meal.
Jump to:
Ingredients

Ingredient Notes:
- Chicken cutlets: you can buy pre-sliced cutlets or cut boneless, skinless chicken breasts in half lengthwise. The most important step is to pound them to an even ¼-inch thickness using a meat mallet or rolling pin. This is a classic Italian technique for keeping the chicken tender, and it's the same approach I use in my chicken limone. Use air-chilled chicken if you can, it browns more evenly and has better flavor.
- Panko breadcrumbs: this gives the coating a light, crisp texture that doesn't feel heavy. Seasoning the breadcrumbs yourself builds the perfect flavor into the crust.
- Parmigiano Reggiano: this makes the crust light and deeply flavorful. Look for Parmigiano Reggiano with the red and yellow DOP seal, meaning it was produced and aged in Italy. It has a savory, well-rounded flavor that adds depth to the coating. Grate it finely yourself so it melts evenly; pre-shredded cheese may contain anti-caking agents that prevent smooth melting. If you have extra Parmigiano Reggiano on hand, you'll love it in my pasta al forno and baked ziti recipes.
- Eggs: this helps the breadcrumbs adhere in a thin, even layer. I love using pasture-raised eggs for a richer color and flavor. Small ingredient differences like this really shine in simple Italian cooking. I use this same approach in my savoiardi and pignoli cookies, where the flavor of the eggs makes all the difference.
- Olive oil and unsalted butter: this pairing is traditional in northern Italian cooking. Olive oil has a higher smoke point, allowing the chicken to crisp without burning, while a little butter adds flavor and creates a golden, lightly caramelized crust. I use this same combination in my tagliatelle Bolognese, where it builds depth and richness right from the start.
Substitutions and Variations
- Use a different breadcrumb: if you don't have panko, unseasoned, dry breadcrumbs will work, but the crust will be denser. If you have day-old or slightly stale bread, you can pulse it into breadcrumbs with a food processor. My stirato bread works well for this. If using pre-seasoned breadcrumbs, taste them first and reduce the salt in the recipe as needed.
- Use a different cheese: if DOP Parmigiano Reggiano isn't available, Grana Padano is a great substitute. Pecorino Romano is delicious as well, it's the classic cheese used in cacio e pepe, and brings a saltier, sharper flavor. Whichever you choose, grate it fresh so it blends smoothly into the coating.
- Use a different cooking oil: since this recipe cooks at moderate heat, I like pan-frying with olive oil for it's flavor. If you prefer using an oil with a higher smoke point, avocado oil is a great option and will still give you a light, crisp crust.
- Switch up the herbs: fresh Italian parsley is traditional, but you could also use basil or a mix of both. If using dried parsley, use less (about 1 teaspoon). If you have extra herbs on hand, they're delicious in my pasta e fagioli and vegetable orzo soup, both of which use fresh herbs to brighten the broth.
Instructions
💡Prefer less mess? An air fryer option is included after Step 4.
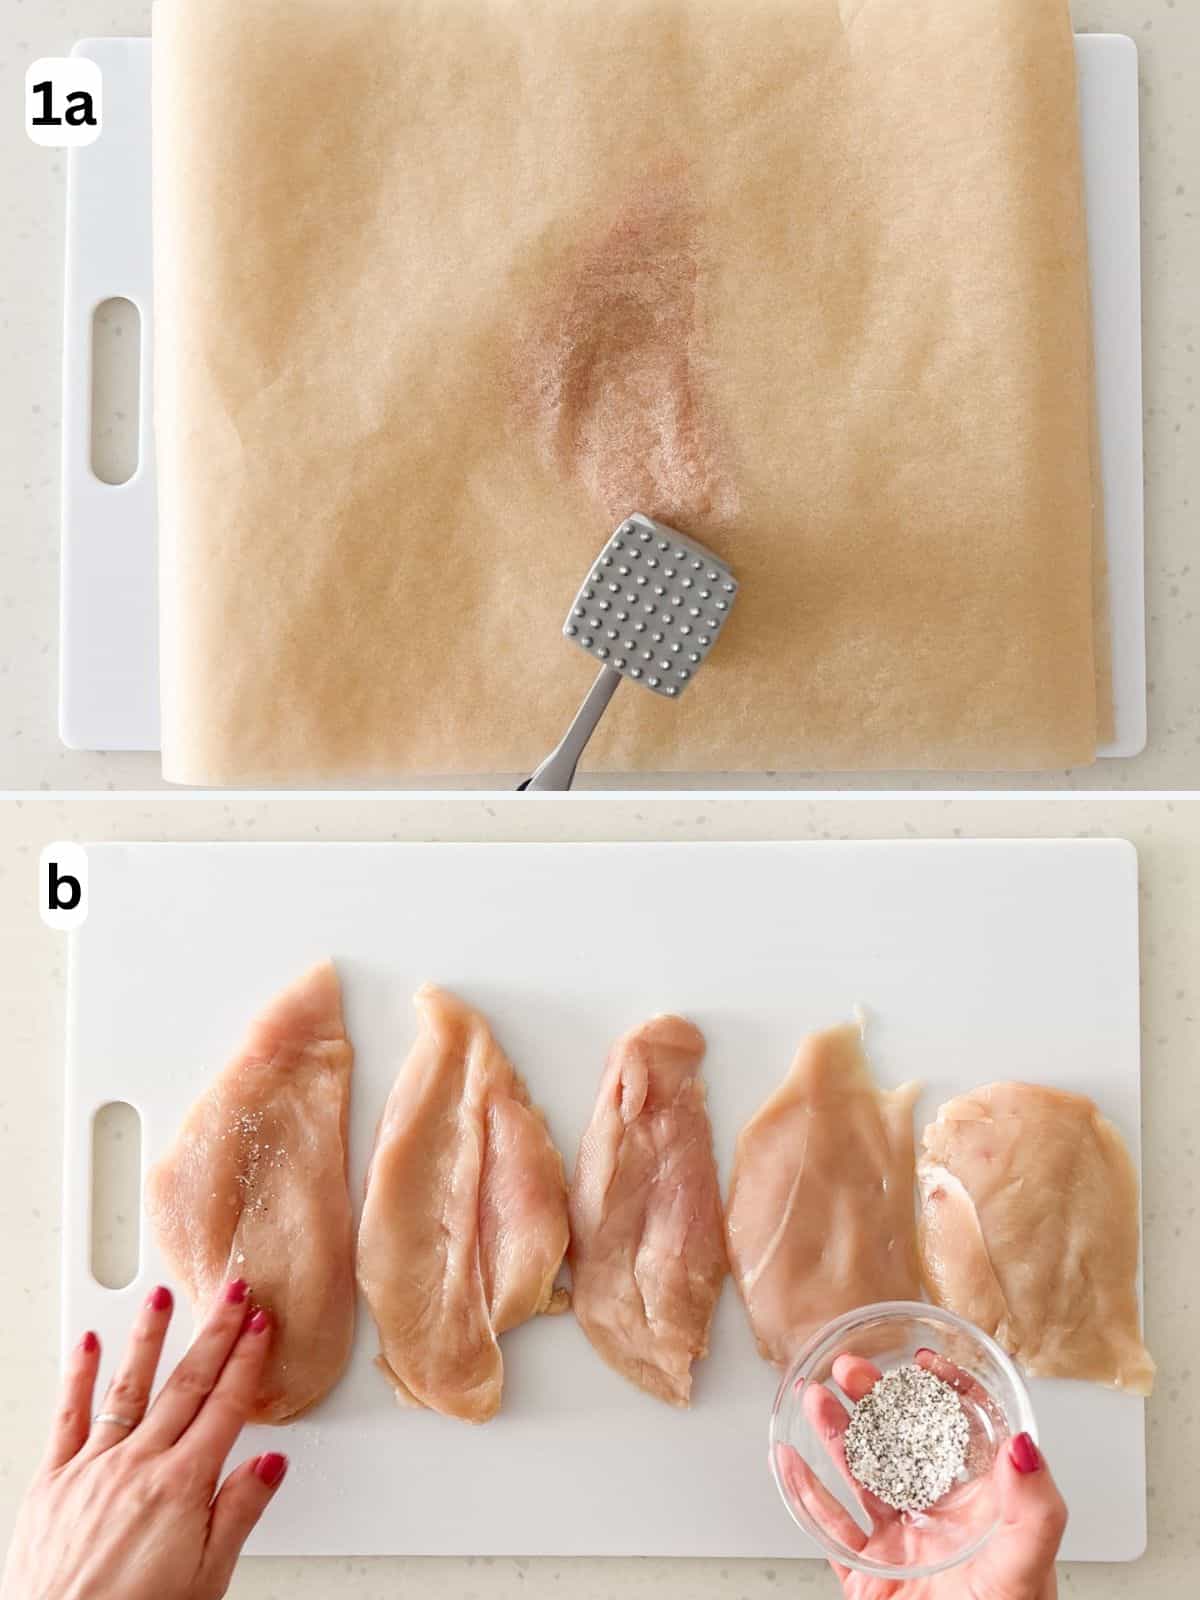
- Pound the cutlets to an even ¼-inch thickness using the flat side of a meat mallet or a rolling pin (image 1a). Season both sides with kosher salt and black pepper, divided evenly among all pieces (image 1b).
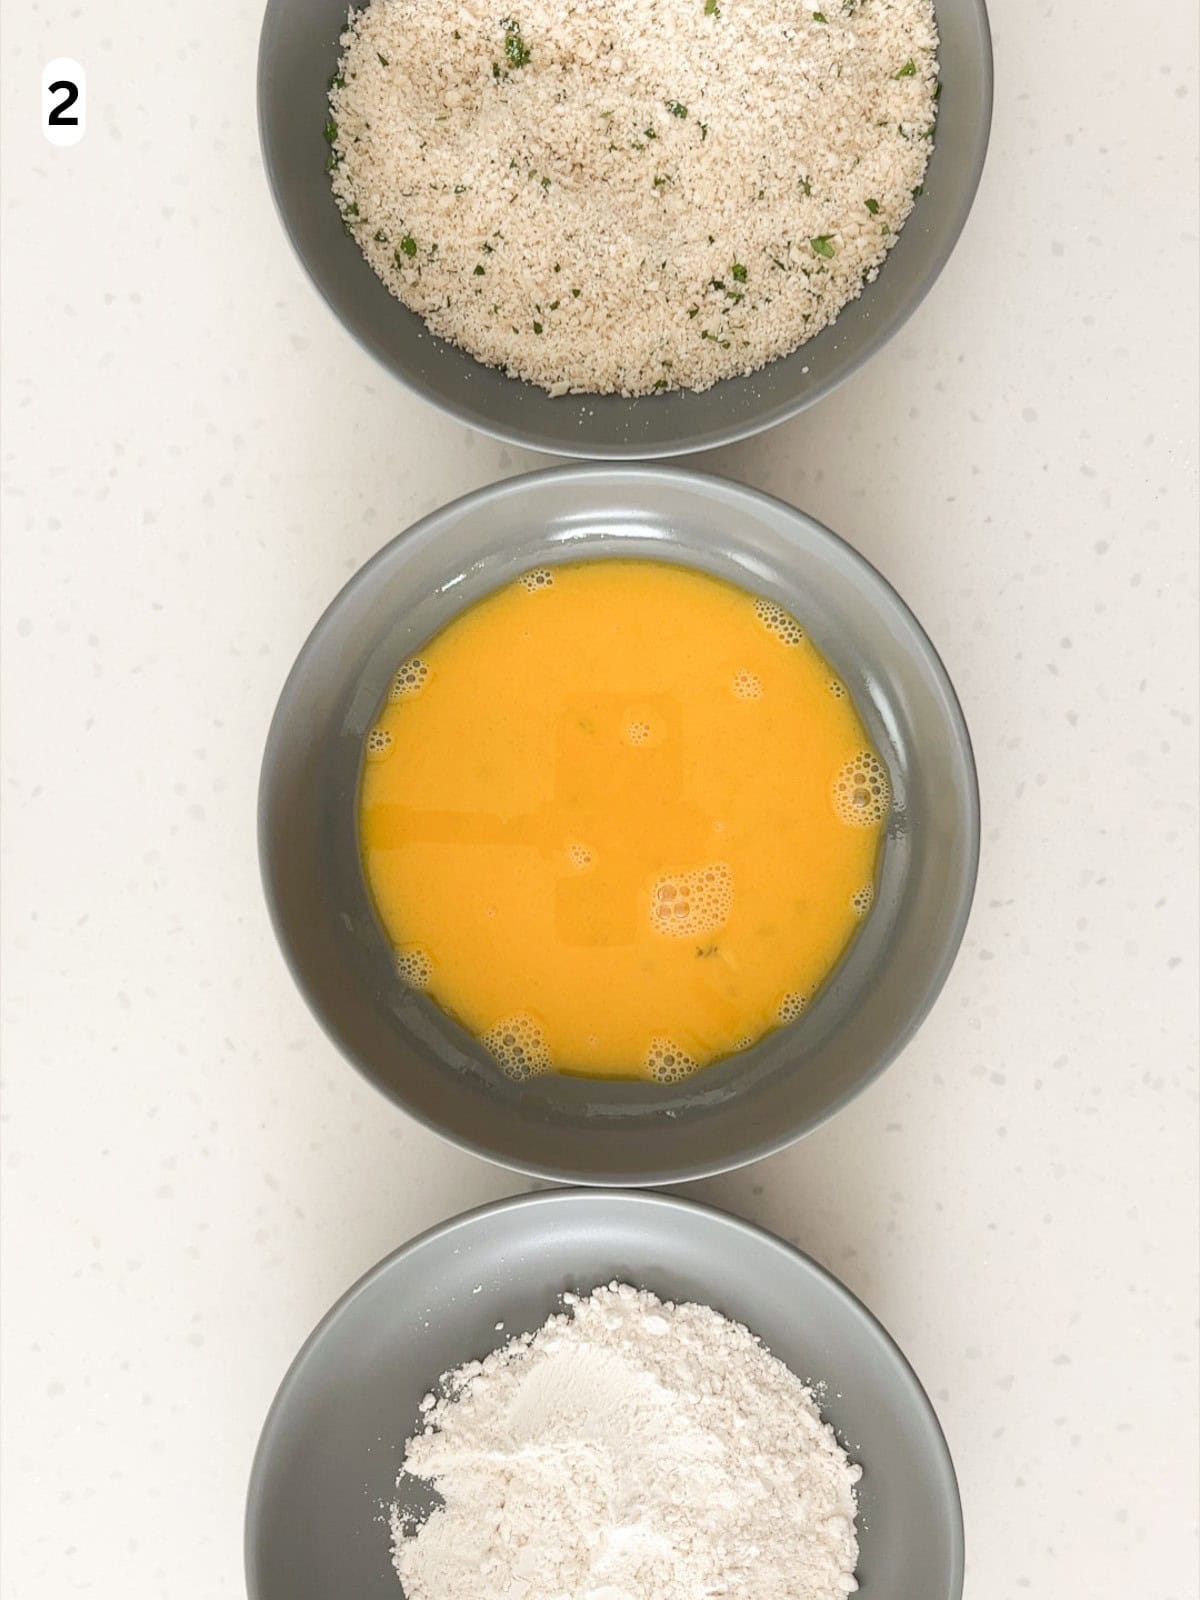
- Set out 3 shallow dishes. Place the flour in the first. In the second, whisk the eggs and water until smooth. In the third, combine the panko breadcrumbs, Parmigiano Reggiano, parsley, kosher salt, and black pepper. Mix well to season the breadcrumbs evenly (image 2).

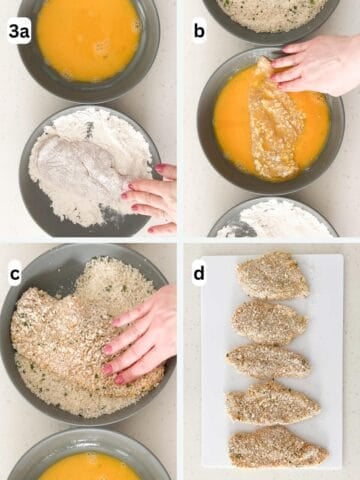
- Coat each cutlet lightly in flour, shaking off the excess (image 3a). Dip into the egg wash, letting any excess drip away (image 3b). Finally, press firmly into the seasoned breadcrumbs until evenly coated on all sides (image 3c). Place the breaded cutlets in a single layer and let them rest for 10 minutes before frying so the coating adheres. Avoid stacking to keep the crust intact and crisp (image 3d).
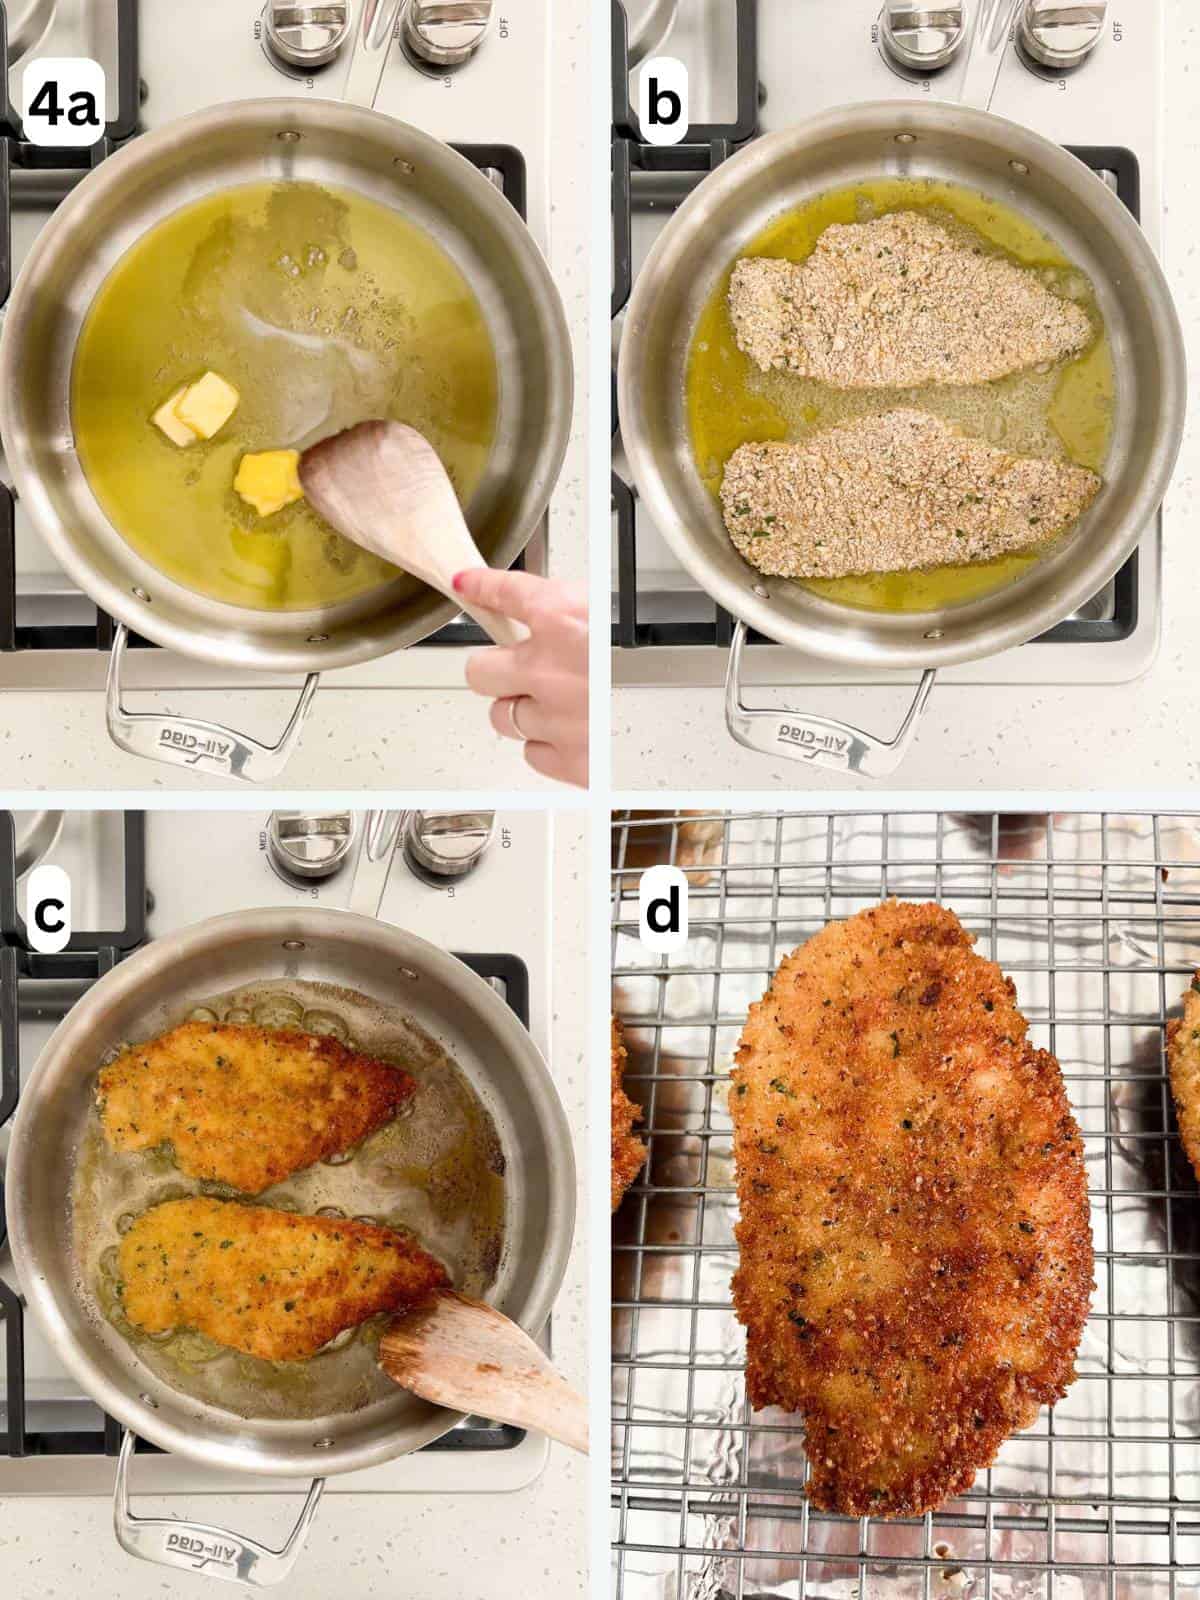
- In a large skillet, heat the olive oil and butter over medium heat (image 4a). To test if the oil is ready, drop in a few breadcrumbs; they should bubble immediately. Pan-fry the cutlets in a single layer, working in batches if needed, for 3 to 4 minutes per side, until golden and crisp (images 4b and 4c). When done, the internal temperature should be 165°F (74°C). Transfer to a wire rack set over a baking sheet to drain (image 4d). Serve immediately and enjoy!
💡Air fryer option (instead of pan-frying): preheat the air fryer to 400°F (200°C). Spray both sides of the breaded cutlets with a cooking oil safe for air fryer use. Arrange in a single layer, cooking in batches if needed. Air fry for 7-10 minutes, flipping halfway, until crisp and the internal temperature reaches 165°F (74°C). I use a pure avocado oil spray made for air fryers, without propellants, residue, or emulsifiers.
Storage & Reheating
- Storage: chicken Milanese is best enjoyed fresh, while the crust is crisp. Any leftovers can be stored in an airtight container in the refrigerator for up to 3 days or in the freezer for up to 3 months. If stacking, place parchment between the layers so the coating stays intact. For frozen cutlets, thaw overnight in the refrigerator before reheating.
- Reheating: all leftovers should be reheated to 165°F (74°C) throughout.
- Air fryer (preferred): reheat at 400°F (200°C) for 5 to 8 minutes, or until warmed through, flipping halfway. This is the best way to refresh the crisp coating.
- Oven: reheat on a baking sheet at 375°F (190°C) for 8 to 10 minutes, or until reaching temperature.
- Avoid the microwave: it will soften the coating and make it lose its crisp texture.
For more helpful details on how to handle leftovers safely, check out this USDA Leftovers and Food Safety guide.
Save This Recipe! 💌
Expert Tips
- Food safety: wash your hands with warm, soapy water before and after handling raw chicken, and use separate cutting boards and utensils to prevent cross contamination. Clean surfaces with hot, soapy water and cook chicken to an internal temperature of 165°F (74°C). For more detailed guidance, see this CDC resource for how to handle raw chicken safely.
- Add water in the egg wash: whisk a tablespoon of water into the eggs. This helps the eggs coat the chicken in a thin, even layer. The added water creates steam when the cutlets hit the hot oil, lightly puffing the coating and keeping it crisp instead of heavy.
- Pound the cutlets evenly: use the flat side of a meat mallet (not the textured side) to pound the chicken to ¼-inch thickness. The flat side spreads the meat evenly and keeps it tender, while the textured side can tear the meat and create uneven cooking. A rolling pin works too.
- Wet hand/dry hand method: when breading the cutlets, designate one hand for the wet ingredients (eggs) and one for the dry (flour and breadcrumbs). This keeps the coating even and prevents clumping.
- Let the coating set: let the breaded chicken cutlets rest for 10 minutes before frying. This helps the coating adhere so it doesn't fall off while cooking.
- Don't overcrowd the pan: cook the cutlets in a single layer, with space between them. Overcrowding lowers the heat and leads to soggy breading.
- Use a wire rack (not paper towels): drain the cooked cutlets on a wire rack set over a baking sheet. Paper towels trap steam and soften the crust, while a wire rack keeps it light and crisp.
FAQ
Both pan-fried and air fryer chicken Milanese are delicious. To help you choose the cooking method, here are some key differences:
Pan-fried chicken Milanese: this is the traditional method. It gives the cutlets a richer, deeper golden crust and classic Italian flavor. If you love a trattoria-style finish or are making this for an Italian Sunday dinner, pan-frying is the way to go.
Air fryer chicken Milanese: a lower-mess option with similar crispness. The crust will be lighter, but a fine mist of an air fryer safe cooking spray helps it brown. If you want a quick-clean up, the air fryer is a great choice.
To keep the breading from falling off chicken Milanese, pat the chicken completely dry before breading. Coat each cutlet in flour, egg wash, and breadcrumbs, making sure each layer is thin and even. Let the breaded cutlets rest for 10 minutes before cooking, as this helps the coating adhere. When frying, cook over moderate heat and wait to flip until the underside is golden. Flipping too soon can pull the coating off.
Chicken Milanese will turn out greasy if the oil is too cool, causing the cutlets to absorb it instead of crisping. Give the oil and butter time to warm up over medium heat. Drop in a few breadcrumbs and if they bubble right away, you're ready to fry. Cook in a single layer, since overcrowding lowers the temperature and leads to soggy breading. After frying, place the cutlets on a wire rack, not paper towels, so steam doesn't soften the crust.
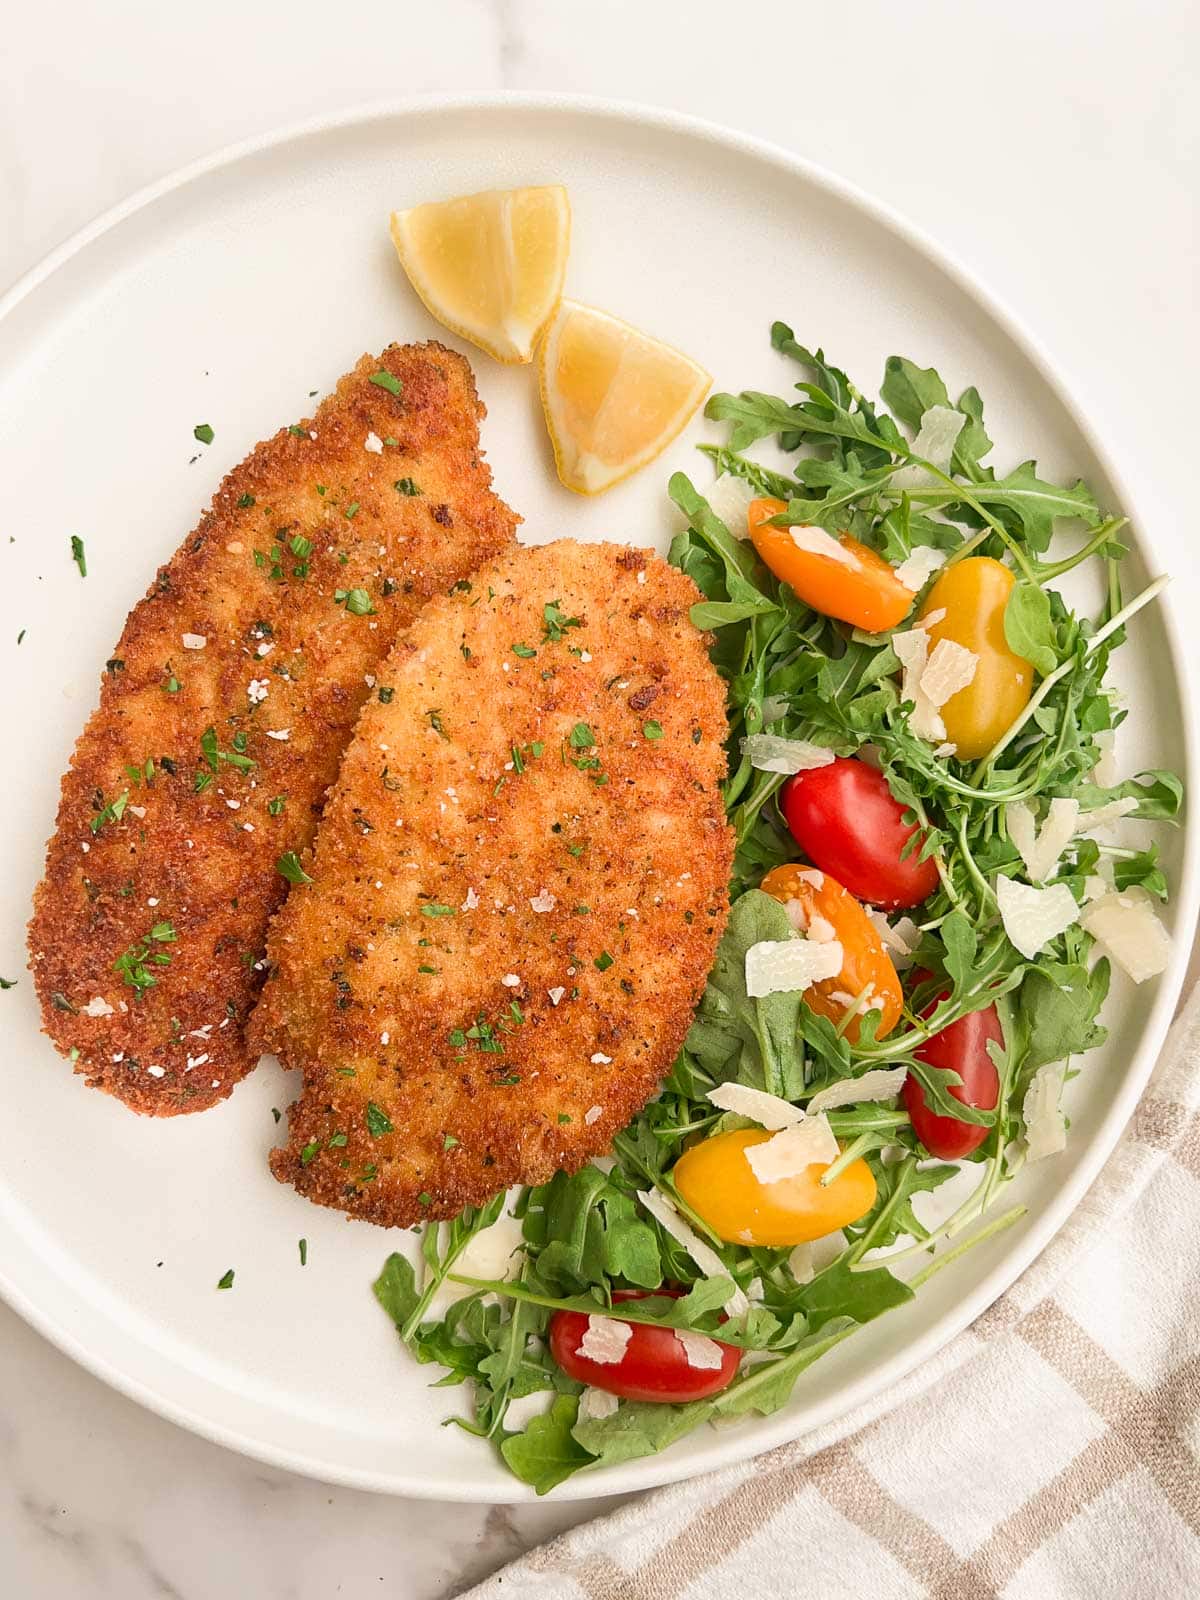
Chicken Milanese is made from thin cutlets that are breaded and pan-fried until light and crisp. It's often served simply with lemon wedges and a fresh arugula salad. Chicken parmesan starts with Milanese-style cutlets, but they're baked with a topping of tomato sauce and melted cheese. Think of chicken Milanese as the lighter, fresher version, and chicken parmesan as the heartier, saucy version.
Serving Suggestions
Chicken Milanese is traditionally paired with a fresh and bright side to balance the crisp coating. Here are my favorites:
- Spinach arugula salad: the peppery greens and bright dressing complement the fried chicken cutlets.
- Burrata caprese salad: creamy burrata and ripe tomatoes add just the right amount of richness and acidity.
- White balsamic vinaigrette: use it to dress a simple green salad, or serve a little on the side as a light dipping sauce for the cutlets
- Pasta with capers: a simple pasta with briny capers and lemon adds brightness and keeps the meal feeling light.
- Ligurian focaccia: topped with tomatoes, this traditional focaccia pairs perfectly with crispy chicken.
Related Recipes
Looking for more easy Italian chicken recipes? You'll love these reader favorites:


Did you make this recipe? Leave a star rating and comment below! For more Italian recipes straight to your inbox, subscribe to my newsletter!
Recipe

Chicken Milanese
Save This Recipe! 💌
Ingredients
- 1 pound chicken cutlets (about 4 to 5 cutlets)*
- 1¼ teaspoons kosher salt (divided into ½ and ¾ teaspoon portions)
- ¾ teaspoon black pepper (divided into ¼ and ½ teaspoon portions)
- ½ cup all-purpose flour
- 2 large eggs
- 1 tablespoon water
- 1 cups panko breadcrumbs (unseasoned)*
- ½ cup Parmigiano Reggiano (finely grated)*
- 2 teaspoons fresh parsley (finely chopped)*
- 4 tablespoons olive oil *
- 2 tablespoons unsalted butter
Instructions
- Prep the chicken: pound the cutlets to an even ¼-inch thickness, with the flat side of a meat mallet or a rolling pin. Season both sides with ½ teaspoon kosher salt and ¼ teaspoon black pepper, divided evenly among all pieces.

- Prep the breading stations: set out 3 shallow dishes. Place the flour in the first dish. In the second, whisk the eggs and water together until blended. In the third, combine the panko breadcrumbs, Parmigiano Reggiano, parsley, and the remaining ¾ teaspoon kosher salt and ½ teaspoon black pepper, mixing well.
- Bread the cutlets: lightly coat each cutlet in flour, shaking off the excess. Then dip in the egg wash, letting any excess drip off. Finally, press each cutlet firmly into the seasoned breadcrumbs until evenly coated on all sides. Place on a dish in a single layer and allow to sit for 10 minutes before frying so the coating adheres. Avoid stacking so the coating stays intact and crisp.
- Fry the cutlets: in a large skillet, heat the olive oil and butter over medium heat. To test if the oil is ready, drop in a few breadcrumbs - they should bubble immediately. Pan-fry the cutlets in a single layer, working in batches if needed, for 3 to 4 minutes per side, until golden and crisp. When done, they should have an internal temperature of 165°F (74°C). Transfer to a wire rack set over a baking sheet to drain. Serve immediately with a fresh arugula salad. Enjoy!If you'd prefer to use an air fryer, see the AIr Fryer Method in the notes below.


Video
Notes
- Air fryer method (instead of pan-frying): complete steps 1-3 of the recipe. Preheat the air fryer to 400°F (200°C). Lightly spray both sides of the breaded cutlets with a cooking oil safe for air fryer use. Arrange in a single layer, cooking in batches if needed. Air fry for 7-10 minutes, flipping halfway, or until the cutlets reach 165°F (74°C) throughout. Cutlets will be lighter in color than pan-fried, but still crisp. A light mist of oil before cooking helps them to brown. I use a pure avocado oil made for air fryers, without propellants, residue, or emulsifiers.
- Chicken cutlets: if you don't have pre-sliced cutlets, you can make your own by slicing boneless, skinless chicken breasts in half lengthwise.
- Panko: you can substitute with unseasoned dry breadcrumbs, but the crust will be denser. If using pre-seasoned breadcrumbs, taste them first and reduce the salt in the recipe as needed.
- Parmigiano Reggiano: Grana Padano or Pecorino Romano are great substitutes. Grate fresh, as pre-shredded cheese may have anti-caking agents that cause uneven melting.
- Parsley: you can substitute with 1 teaspoon of dried parsley. Basil is a great substitute or you can do a mix of basil and parsley for a slightly sweeter flavor.
- Olive oil: if you prefer an oil with a higher smoke point, avocado oil is a great substitute.
- Food safety: wash your hands with warm, soapy water before and after handling raw chicken. Use separate cutting boards and utensils to prevent cross contamination and clean surfaces with hot, soapy water. For more detailed guidance, see this CDC resource for how to handle raw chicken safely.
- Storage: chicken Milanese is best enjoyed fresh while crisp. Any leftovers can be stored in an airtight container in the refrigerator for 3 days or the freezer for 3 months. Thaw frozen cutlets overnight in the refrigerator before warming up.
- Reheating: all leftovers should be heated to 165°F (74°C) throughout. For the air fryer (preferred): reheat at 400°F (200°C) for 5 to 7 minutes, flipping half way, or until reaching temperature. For the oven: reheat on a baking sheet at 375°F (190°C) for 8 to 10 minutes, or until reaching temperature.
Nutrition
The provided nutrition and storage information is estimated. Accuracy is not guaranteed.
See our Disclaimer for more information.
Maria D'Errico says
I hope you enjoy my chicken Milanese recipe! My family loves this dish because the cutlets are perfectly crisp without being too heavy. Plus they're easy to make! I'd love to hear what you think.